Scuba Hand Signals: Underwater Communication Guide (2026)
Master essential scuba hand signals for Cozumel dives. Learn OK, stop, ascent, air checks, and marine-life signs with a local dive guide's practical tips.
Carmen Novelo · October 8, 2026
The most important scuba hand signals every diver should know are OK (thumb and forefinger forming a circle), Stop (flat palm extended), Up/Down (thumb gestures for movement direction), and problem indicators that let you report issues to your buddy before they escalate. These core signals form the foundation of safe underwater communication in Cozumel and at dive sites everywhere, helping you coordinate with your team when speech is impossible and visibility can vary. Beyond the essentials, a working knowledge of direction signals, marine-life indicators, and equipment checks turns any dive into a smooth conversation between buddies and makes the difference between pointing vaguely at something interesting and actually sharing the experience with your team.
In my years guiding divers on drift dives and along deep walls, I always tell new guests to practice their core signals on the boat ride out—rehearse them until you don't have to think, because depth and current are not the time to fumble your way through asking if your buddy is okay. Clear hand signals are not just polite etiquette; they are the lifeline that keeps every dive safe, efficient, and enjoyable. This guide walks you through widely used signals, tips for improving your own signaling, and the communication practices that protect both you and the reef while you explore it.
Key Takeaways
- Master core signals—OK, Stop, Up/Down, and problem indicators—before every dive; they form the common language of safe underwater communication.
- Use the full-hand OK signal (not the surface thumbs-up, which means ascend) and confirm every query with a clear, deliberate response to avoid miscommunication.
- Learn marine-life and direction signals to share sightings and coordinate with your buddy, and always agree on any unique signals during the pre-dive briefing.
- Practice signals on land and during confined-water sessions so you can execute them smoothly under stress, in low light, or when wearing thick gloves.
- Respect reef etiquette by using signals to indicate 'do not touch' and 'watch your fins,' and communicate problems early to prevent small issues from escalating.
Why Hand Signals Matter Underwater
Underwater, sound travels differently and speech is impossible through a regulator, so divers rely entirely on visual communication. Hand signals bridge that gap. They let you check in with your buddy, report your air supply, point out hazards, share the location of a turtle or eagle ray, and coordinate ascents or safety stops—all without breaking the rhythm of the dive. A clear signal system reduces stress, sharpens situational awareness, and keeps the group cohesive.
Training agencies such as PADI and SSI teach sets of hand signals during Open Water courses, and core signals are recognized at many dive sites worldwide. While regional variations and specialty signals exist—more on those later—a shared vocabulary helps divers communicate the essentials. In environments like Cozumel's walls and drift reefs, where depth and marine traffic demand constant coordination, fluency in hand signals is as fundamental as buoyancy control.
When you think about dive planning, most people focus on choosing the right site, checking weather forecasts, and confirming logistics with their operator. Yet communication strategy deserves equal attention. Before you board the boat, you should know exactly how you will coordinate with your buddy throughout the dive, what signals you will use when things go as planned, and how you will communicate when they do not. This pre-dive mental preparation is as important as adjusting your weight belt or testing your regulator, and it sets the tone for a smooth, confident dive from descent to safety stop.
The Limits of Gesture Communication
Hand signals work well for simple, immediate messages but have limits. Complex instructions, detailed dive-plan changes, or nuanced problem-solving still require surface discussion or a slate. Visibility matters too: signals are useless in heavy particulate, at night beyond your light beam, or when your buddy is looking the wrong way. Good divers compensate by staying close, making eye contact before signaling, and using a light tap or gentle touch to get attention without startling their partner. Understanding these constraints helps you choose the right moment and method for each message.
Distance is another factor to consider. Signals that are clear at arm's length may be impossible to read from across a reef, especially if current or surge is moving your hands. Strong currents, in particular, can make holding a steady signal position challenging. You might need to brace against the reef frame with your legs—hovering just above the bottom without contact—or find shelter behind a coral head to deliver a clear message. Learning to adapt your signaling to the physical conditions of each dive is part of maturing as a diver, and it is a skill you will refine over many dives in varied environments.
Another limitation is the cognitive load on newer divers. During your first few open-water dives, you are managing buoyancy, monitoring depth and air, equalizing your ears, and trying to enjoy the experience all at once. Adding signal recognition to that mental stack can feel overwhelming. Instructors know this and will check in frequently, keep signals simple, and give you time to process each message. As you gain experience, signaling becomes automatic, freeing mental bandwidth for navigation, marine-life observation, and group coordination.
Core Signals Every Diver Should Know
These signals are widely taught in entry-level courses. Commit them to muscle memory before you descend.
OK – Are You Okay? / I Am Okay
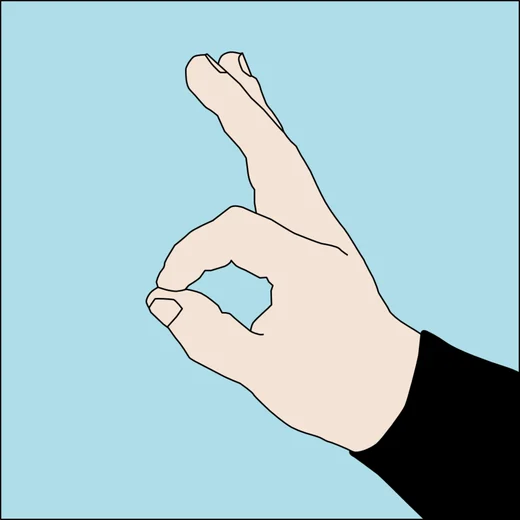
Form a circle with your thumb and index finger, extending the other three fingers. This is both a question and an answer. When your divemaster or buddy flashes you the OK sign, respond immediately with the same gesture if you are comfortable, or signal a problem if you are not. Never use a thumbs-up to mean okay; that signal means ascend and can trigger an unwanted early end to the dive. The OK check is typically exchanged at descent, mid-dive, and before beginning ascent.
What makes the OK signal so powerful is its simplicity and clarity. Even in reduced visibility or at a distance, the distinctive circle shape stands out. When you form the circle, hold it steady for a moment so your buddy has time to see and register it. If you are asking the question, maintain eye contact and wait for a response before continuing the dive. If you do not receive a clear answer, ask again. Never assume silence means everything is fine. A diver who is struggling may be too task-loaded to remember to respond, and your persistence can catch a developing problem before it escalates.
On the surface, before descent or after surfacing, divers often raise one arm overhead with the OK circle facing the boat. This tells the captain and crew that you are fine and do not need assistance. On a drift dive, where the boat may be tracking you from a distance, this surface OK is an important part of pickup protocol and should be executed clearly so the crew can confirm your status.
Stop – Hold Position
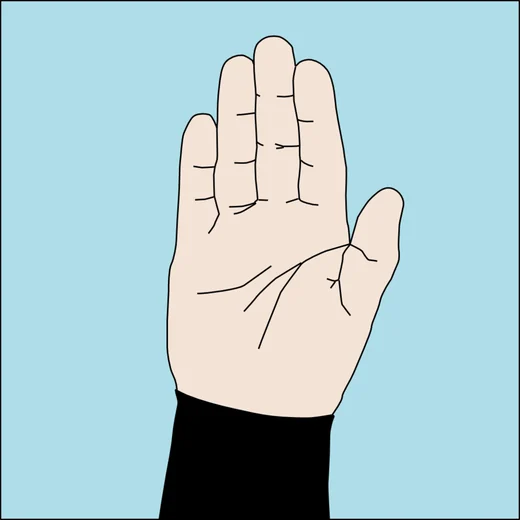
Extend one arm with palm flat and facing your buddy, fingers together, as if directing traffic. This signal tells your team to halt immediately, hold depth, and wait for further instruction. Divemasters use Stop to freeze a group before pointing out camouflaged marine life, to pause ascent, or to keep divers from drifting past a mooring line. Respond by neutralizing your buoyancy and staying still until you receive the next signal.
The Stop signal is also critical in managing group safety. If a divemaster sees one member of the group ascending too fast, drifting toward a hazard, or approaching a restricted area, a firm Stop signal can prevent an incident. When you see Stop, the correct response is immediate compliance. Do not continue finning, do not drift forward with momentum, and do not look around wondering what is happening. Halt, stabilize, and then scan for the next instruction. Your quick response keeps the team synchronized and demonstrates good dive discipline.
New divers sometimes confuse Stop with other gestures or delay their response while they finish adjusting a strap or clearing their mask. Practice recognizing and obeying the Stop signal during training dives so that your response becomes instant. In an emergency, those seconds matter. A divemaster who signals Stop and sees immediate compliance can then address the issue—whether it is a passing boat overhead, a medical problem in the group, or a navigational correction—with confidence that the team is stable and waiting.
Up, Down, and Level – Direction of Movement


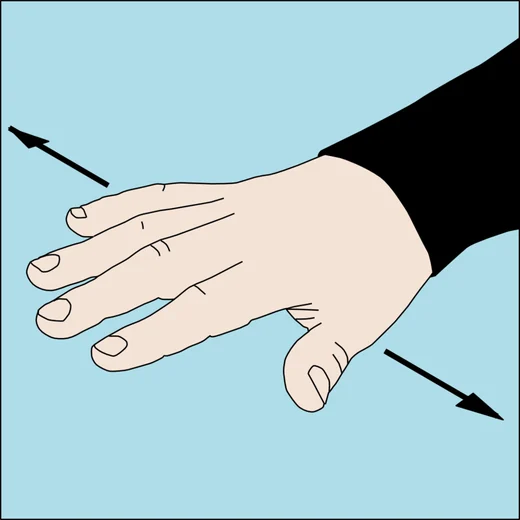
Thumb pointing upward means ascend; thumb pointing downward means descend; flat hand moving horizontally means stay level or move laterally. Context matters: a slow upward thumb during the dive suggests a controlled ascent to a shallower depth, while a rapid upward thumb combined with urgency on the face signals an immediate need to surface. Use these signals to coordinate depth changes with your buddy, to suggest moving over a reef crest, or to begin a safety stop. Never give a casual thumbs-up as a greeting underwater—it will be interpreted as a request to end the dive.
Understanding the context behind directional signals is part of reading the underwater conversation. If your divemaster gives a slow, calm upward thumb after an exciting encounter at depth, it likely means the planned profile calls for moving shallower now. If the same signal is given quickly, with wide eyes and a pointing gesture toward the surface, it signals urgency. Learning to read body language alongside hand signals makes you a more effective communicator and a safer buddy.
The flat-hand level signal is especially useful on walls and slopes, where depth can change rapidly if you are not paying attention. A quick horizontal sweep with your hand reminds your buddy to hold contour, maintain depth, and avoid drifting deeper unintentionally. On a drift dive along a wall, staying level as a team keeps everyone in visual contact and ensures you all surface in the same area, making pickup easier and safer.
Air-Related Signals
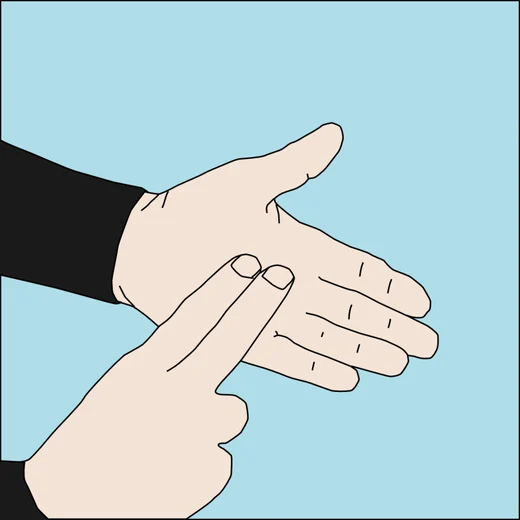
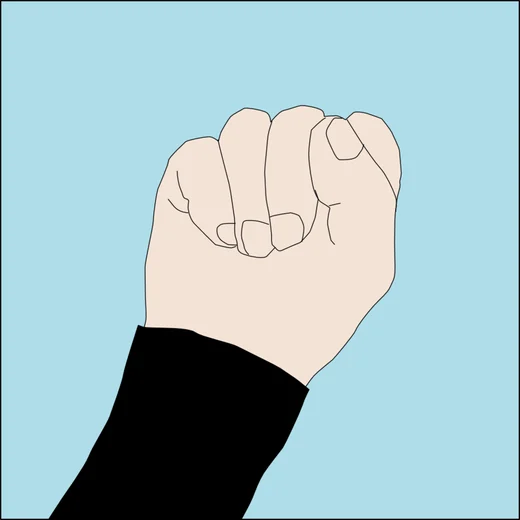
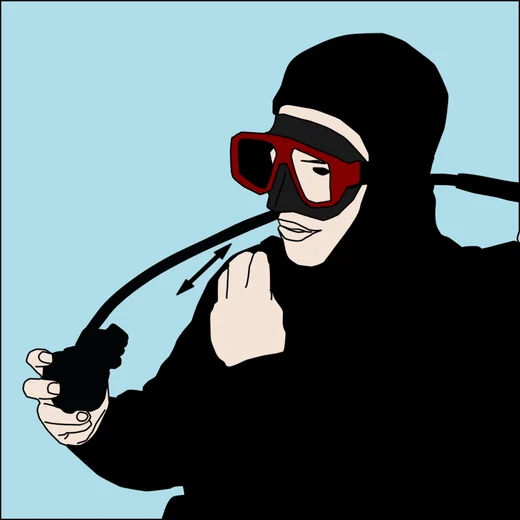
Monitoring air supply is a shared responsibility. Many divers tap their pressure gauge to ask 'how much air?' and respond by holding up fingers to indicate remaining pressure in bar or psi. Agree on units and shorthand during the briefing. If you are running low and need to begin ascent, communicate clearly to your buddy; the exact gesture varies by region and instructor, so confirm your team's low-air signal during the pre-dive discussion. Regular air checks keep the team synchronized and prevent one diver from reaching reserve while the others are still comfortable.
Air management is one of the most important aspects of dive safety, and clear communication about air status prevents the majority of out-of-air emergencies. When your buddy taps their gauge and looks at you, respond immediately with your current pressure. Do not round up optimistically or delay because you want a few more minutes on the reef. Accurate, honest air reporting keeps the team safe and allows the divemaster to make informed decisions about the dive plan.
Some divers use a specific number of fingers to indicate thirds of a tank, while others signal exact hundreds of bar or psi. Confirm your method before the dive. If you dive in a group with mixed measurement preferences, agree on a common system or be prepared to translate. For example, if you use bar and your buddy uses psi, know the rough conversion so you can interpret their response. This may seem like a small detail, but miscommunication about air can lead to dangerous situations, especially on deeper dives or when drift diving far from the boat.
Problem and Emergency Signals
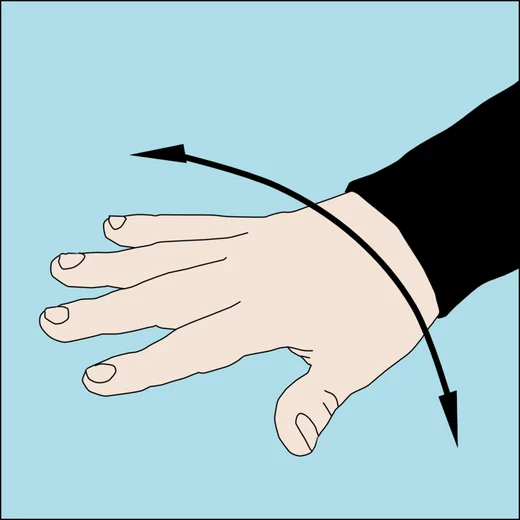
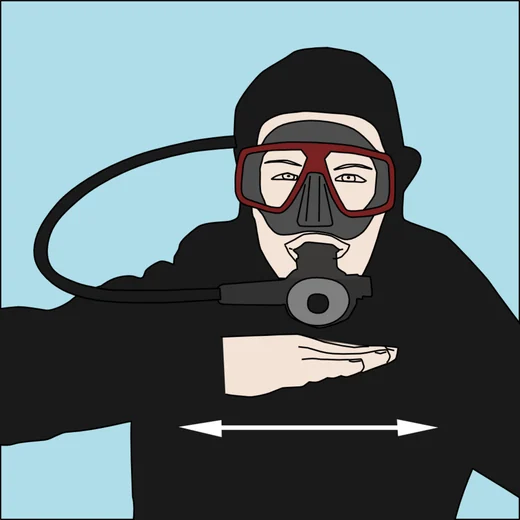
Extend one hand flat and rock it side to side, palm down, in a wobbling motion to indicate a general 'not okay' or 'something is off.' This tells your buddy you are experiencing a minor issue—ear equalization trouble, a bit of nausea, a leaking mask—that you want to address but that does not yet require ending the dive. Your buddy will typically respond with the OK query, and you can follow up with a more specific signal or gesture. Use this early to prevent small problems from growing. If you have a true emergency—out of air, severe injury, or uncontrolled ascent—use an agreed-upon distress signal and your buddy will respond with immediate assistance. Confirm your team's emergency signals during every briefing.
The 'something wrong' signal is your early-warning system. Use it liberally. If you feel even slightly uncomfortable, signal it. Your buddy would much rather pause for thirty seconds while you clear your mask or adjust a strap than deal with a full-blown problem later. Good divers communicate small issues immediately, knowing that underwater problems tend to compound if ignored. A small leak becomes a flooded mask, mild discomfort becomes panic, and a minor ear squeeze becomes a ruptured eardrum. Signal early, address the issue, and continue the dive with confidence.
In a true emergency, the exact signal you use depends on your training and your team's briefing. Some divers use a slashing motion across the throat to indicate out of air, while others wave both arms overhead in a distress signal. Regardless of the specific gesture, the key is urgency and clarity. Make the signal large, repeat it if necessary, and maintain eye contact with your buddy so they know you need immediate help. Your buddy's response should be swift and practiced—whether that means sharing air, assisting with buoyancy, or beginning a controlled emergency ascent together.
Common Status and Equipment Signals
Beyond the core set, a handful of status signals let you communicate discomfort or equipment issues before they escalate.
Ear Problem or Equalization Trouble
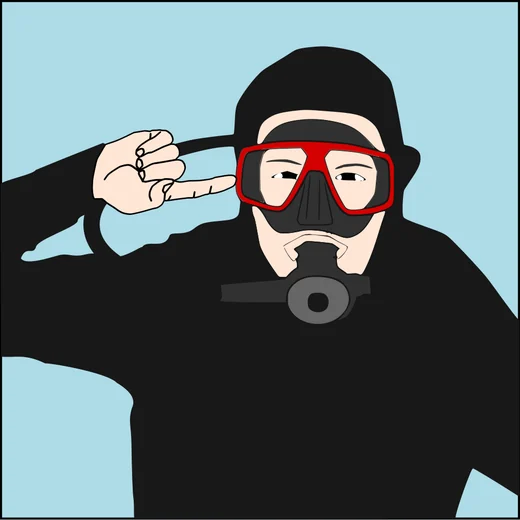
Point to your ear with one finger and optionally make the 'something wrong' wobble. This indicates you are having difficulty clearing your ears and may need to ascend a meter or two to relieve pressure before continuing the descent. Ear trouble is common, especially on the first dive of the day, and addressing it immediately prevents injury. Your buddy should slow or pause descent, give you time to equalize, and check in again before proceeding deeper.
Ear equalization is one of the most common challenges for divers at all levels. Even experienced divers occasionally struggle with congestion, sinus pressure, or tight Eustachian tubes. When you signal an ear problem, your buddy and guide should respond with patience and support. There is no shame in pausing descent or ascending slightly to equalize. Forcing descent with blocked ears can cause barotrauma, ruptured eardrums, and permanent hearing damage. Always signal ear trouble immediately and never try to push through the pain.
If equalization remains difficult after several attempts, consider ending the dive and trying again later or the next day. Your ears may simply need more time to adjust, especially if you have recently arrived from a different altitude or climate. Many dive operators in Cozumel understand this and will work with you to reschedule or adjust your dive plan. Communicating the issue clearly through signals and surface discussion ensures everyone understands the situation and can respond appropriately.
Cramp or Pain
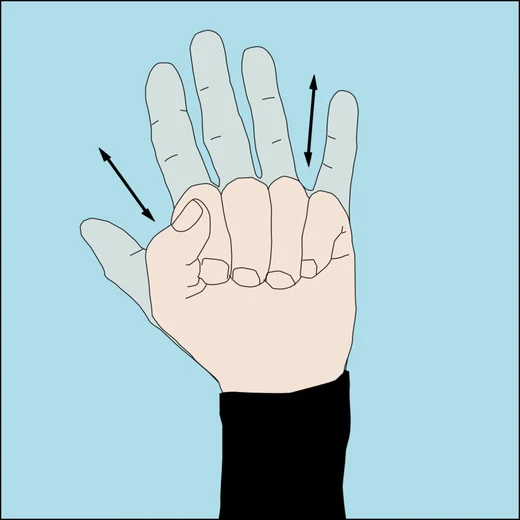
Point to the affected area—calf, thigh, shoulder—and grimace or make the 'problem' wobble. Cramps usually resolve with a pause, a stretch, or a change in finning technique. Communicate clearly so your buddy knows to slow the pace and help if needed. Persistent or severe pain requires ending the dive and surfacing with proper safety protocol.
Cramps often strike when you least expect them, especially if you are kicking hard against current or if you did not hydrate adequately before the dive. When a cramp hits, the immediate response is to stop finning, signal your buddy, and attempt to stretch the muscle gently. Your buddy can assist by holding your position or helping you adjust your body angle to relieve the cramp. Once the spasm passes, resume the dive slowly and adjust your finning style to prevent recurrence. If cramps persist or worsen, signal your buddy and begin a controlled ascent. Continuing to dive through severe muscle pain is unsafe and can lead to exhaustion or loss of control.
Cold
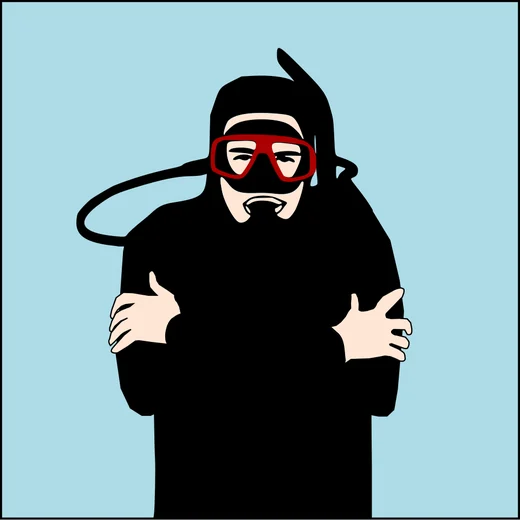
Hug yourself with both arms and shiver, or cross your arms over your chest. This tells your buddy you are uncomfortably cold and may want to shorten the dive or ascend to warmer shallow water. Acknowledge the signal and agree on a plan, because severe cold can impair judgment.
Cold water affects divers differently depending on body composition, exposure-suit thickness, and acclimatization. What feels comfortable to one diver may be frigid to another. If you signal cold, your buddy should take it seriously. Hypothermia impairs cognitive function, slows reaction time, and increases the risk of decompression illness by reducing circulation. If you are cold, discuss surfacing or moving to shallower, warmer water. Do not tough it out in silence. Your comfort and safety are more important than extending bottom time, and a warm, enjoyable dive is always better than a long, miserable one.
Entangled / Caught
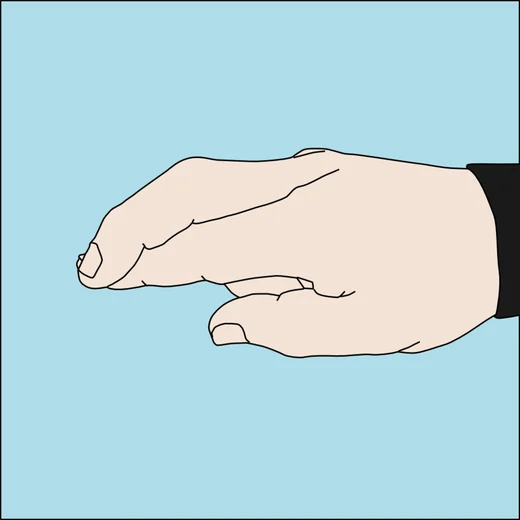
Cross your wrists or grab your own arm as if bound, and point to the entangled gear or limb. This tells your buddy you are stuck—on fishing line, in kelp, or on a wreck—and need assistance. Your buddy will approach slowly, assess the situation, and help free you without cutting unless necessary. Stay calm and avoid thrashing, which tightens entanglement and stirs sediment.
Entanglement is one of the more stressful situations a diver can face, but calm communication and a methodical approach almost always resolve it quickly. When you signal entanglement, stop moving immediately. Thrashing or pulling usually makes things worse. Your buddy will swim over, identify the snag, and begin working to free you. If you are caught on fishing line, they may need to cut it with a knife or shears. If you are tangled in kelp or a mooring line, they can often free you by gently unwinding or lifting the obstruction. Throughout the process, maintain eye contact, breathe slowly, and trust your buddy. Panic is the real danger in entanglement situations, and clear signaling combined with teamwork will get you free safely.
Direction and Navigation Signals
Coordinating movement and sharing points of interest requires directional gestures that go beyond simple up and down.
Which Way? / Go This Way
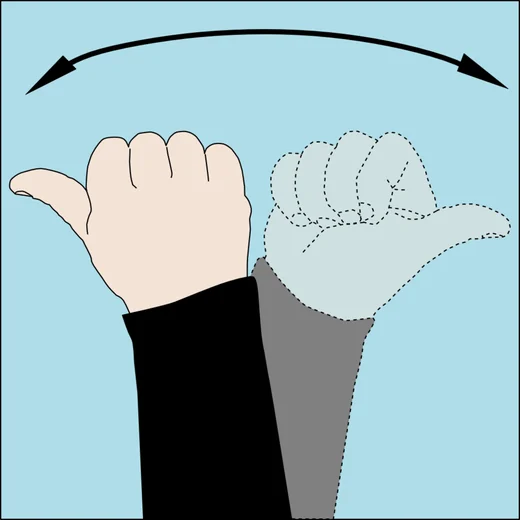
Point in the desired direction with a flat hand or extended index finger. When asking 'which way?', sweep your finger in an arc and raise your eyebrows in a questioning expression. Your buddy can respond by pointing clearly in the intended direction. On drift dives, quick directional communication keeps the team together and prevents backtracking against current.
Navigation signals are especially important when diving in unfamiliar sites or when the divemaster is leading a group along a complex route. If you become momentarily disoriented or lose sight of the group, signal 'which way?' to a buddy or nearby diver, and they can point you back toward the team or the planned route. Staying oriented and in visual contact with your team is a core safety practice, and clear directional communication is the tool that makes it possible.
Look at This / Over There
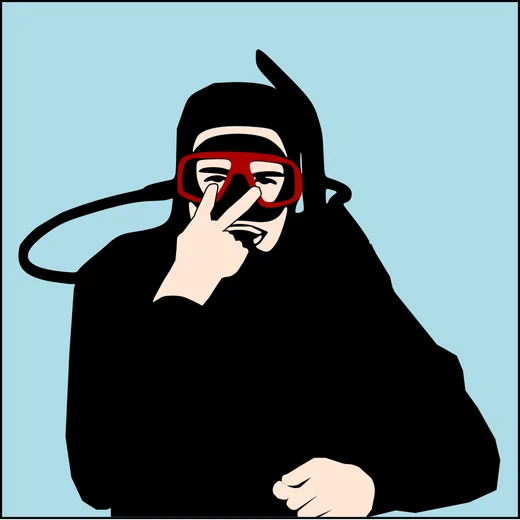
Point at the object with your index finger and make eye contact with your buddy to ensure they follow your gesture. For small or camouflaged subjects—a seahorse in gorgonian, a flamingo tongue snail on coral—you may need to point very precisely and hold the position while your buddy swims closer. Avoid touching the reef or the animal; your finger should hover a safe distance away. Some guides use a small pointer stick to indicate subjects without risk of contact.
Sharing wildlife sightings is one of the great joys of buddy diving. When you spot something interesting, the immediate instinct is to point and hope your buddy sees it. But vague pointing often fails. Instead, make deliberate eye contact first, signal 'look here,' and then point precisely at the subject. If necessary, move your body so your buddy can follow your line of sight. Once they are looking in the right area, you can refine your point or use a light to illuminate the subject. The effort you put into clear, patient pointing ensures your buddy shares the moment and creates a richer experience for both of you.
Turn Around / Reverse Direction
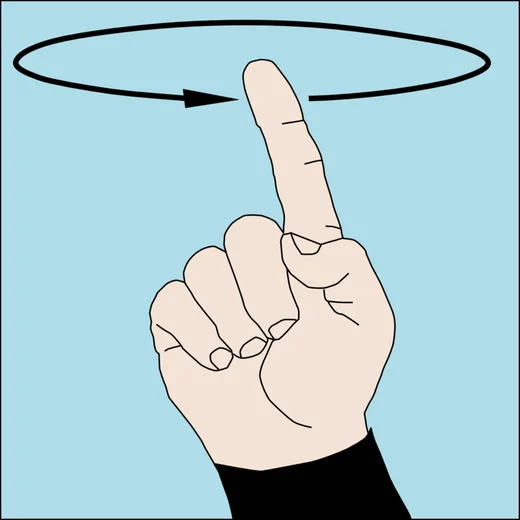
Rotate your index finger in a circular motion, or point behind you and make a turning gesture. This signals that the team should reverse course, often because the current has shifted, the dive plan calls for a loop, or the group needs to return to the mooring line. Confirm with the OK signal before executing the turn to ensure everyone is ready.
Reversing direction as a team requires coordination and clear communication. If the divemaster signals a turn, the entire group should acknowledge, check their position relative to one another, and execute the turn together. Straggling or failing to turn in sync can split the group and create confusion. Always confirm you have received and understood the turn signal, check that your buddies are also turning, and proceed as a cohesive unit. Good group dynamics make multi-diver dives safer and more enjoyable for everyone.
Stay Together / Come Here
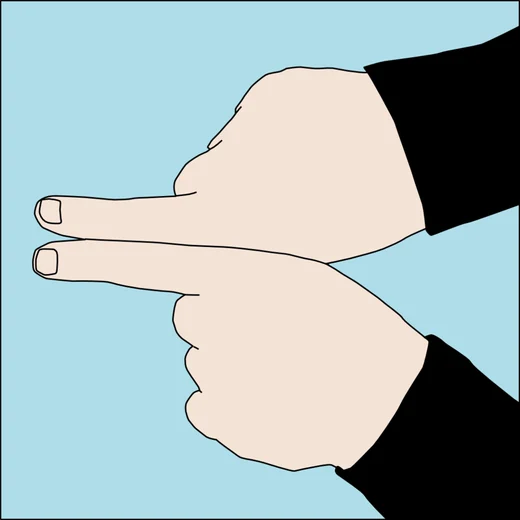
Bring your hands together, palms facing each other, or wave one hand toward yourself in a beckoning motion. This tells scattered buddies to regroup and tighten the team. It is especially useful when one diver drifts ahead on a drift dive or when approaching a narrow swim-through that requires single-file passage.
Maintaining team cohesion is a shared responsibility. If you notice the group spreading out, signal 'stay together' and wait for everyone to regroup before continuing. A compact team is easier to manage, easier to account for during the dive, and safer in the event of an emergency. Divemasters appreciate divers who help maintain group shape and respond quickly to regrouping signals, because it allows the dive to proceed smoothly without constant counting and repositioning.
Marine Life and Photography Signals
Sharing wildlife encounters and coordinating around photographers adds richness to group dives and helps everyone enjoy the reef responsibly. Many divemasters and regular buddies develop shorthand for common species, but these gestures are not universal. A flat hand gliding through the water might mimic a ray; a fin-wiggle with one hand on your head might suggest a shark; two hands paddling slowly like flippers could indicate a turtle; wriggling fingers might evoke an octopus. Confirm any species signals during the briefing. When you spot something, make eye contact, signal the species if you have an agreed-upon gesture, and point carefully so others can see without crowding the animal.
Marine-life signals add a playful, expressive dimension to underwater communication. Over time, regular dive buddies often develop their own shorthand for favorite animals, inside jokes, and shared experiences. While these personal signals are fun and effective within your team, remember that a new buddy or guide will not know them. Always default to clear, simple gestures when diving with someone new, and introduce any personal signals during the briefing so everyone understands.
Big Fish / Small Fish
Spread your hands wide apart for a large animal, or pinch your fingers close together for something tiny. This gives your buddy scale before they start looking, so they know whether to scan the blue water for a passing eagle ray or peer into a crevice for a goby.
Size cues are surprisingly helpful, especially when visibility is limited or the subject is difficult to find. If your buddy signals 'big fish' and points into the blue, you know to look out into open water rather than scanning the reef face. Conversely, a 'tiny' signal followed by precise pointing tells you to slow down, get close, and look carefully at a specific spot. These simple size signals make shared sightings faster and more successful.
Photographer Working / Wait
If you or a teammate is setting up a shot, hold one hand flat in a Stop gesture and point to the camera with the other. This asks the group to pause, hold position, and avoid kicking up sediment or startling the subject. Respect the signal, stay neutral, and wait until the photographer gives the OK before moving on.
Underwater photography requires patience and stillness from the entire team. Divers who rush past, kick up sand, or crowd the subject ruin shots and stress marine life. If you see a photographer working, give them space, hold your position, and control your buoyancy so you do not drift into the frame or disturb the bottom. Once the photographer signals they are done, resume the dive. This courtesy is part of good dive etiquette and is appreciated by photographers, who often spend considerable effort setting up lighting and framing for a single image.
Safety Stop and Ascent Signals
Controlled ascents and safety stops are critical to safe diving, and clear signaling during this phase prevents rushed or uncoordinated endings. Many recreational divers complete a safety stop—commonly three minutes at around five meters (fifteen feet)—before surfacing. The common signal is a flat hand held horizontally, palm down, with three to five fingers of the other hand held beneath it, indicating the number of minutes. Some teams instead tap a wrist or point to a depth gauge or computer. Signals vary between agencies and operators, so confirm your team's safety-stop signal during the briefing. Stay together, monitor your computer, and do not rush the ascent even if you feel fine.
The safety stop is a ritual that reinforces discipline and patience. Even though it is not strictly required on shallow recreational dives, performing a stop on every dive builds good habits and reduces decompression stress. When the divemaster signals safety stop, the entire team should slow ascent, gather around a visual reference—often a mooring line or reef ledge—and hold depth together. Use the time to check your remaining air, review your dive in your mind, and enjoy the final moments underwater. A calm, deliberate safety stop is the mark of a mature diver and sets the tone for a smooth surface interval.
Slow Down Ascent
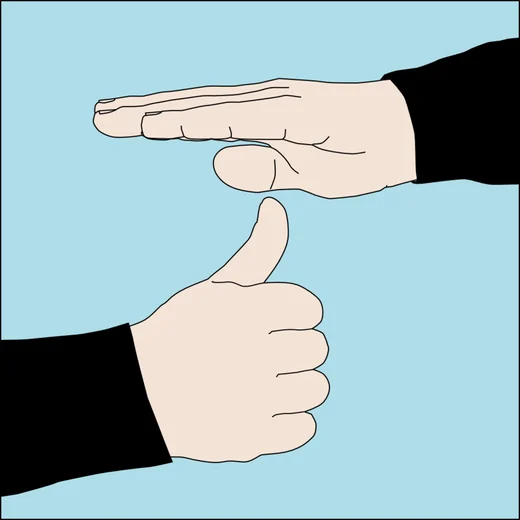
Hold your hands flat, palms down, and move them slowly downward or hold them still in a calming gesture. This tells a buddy who is ascending too quickly to reduce their rate. If you see someone rising fast, signal firmly and make eye contact.
Rapid ascents are one of the leading causes of decompression illness and lung overexpansion injuries. If you notice your buddy ascending too quickly—whether due to buoyancy loss of control, panic, or inattention—signal immediately. A firm, clear 'slow down' signal combined with eye contact can interrupt the ascent and give your buddy a chance to regain control. If they do not respond, you may need to swim alongside them, make physical contact, and help them vent air from their BC while slowing the ascent together. This is a scenario you practice during rescue training, but even as a recreational diver you can and should intervene when you see a dangerous ascent rate.
Deployed Surface Marker Buoy (SMB)
Point upward and make an inflating gesture, or simply point to the SMB reel in your hand. This signals that you are deploying a surface marker to alert the boat of your location. Your buddy should give you space, stay clear of the line, and continue the safety stop while you manage the reel. Deployment is especially important on Cozumel drift dives where the boat must track moving teams.
Deploying an SMB requires focus and coordination, and clear signaling helps your buddy support you during deployment. When you signal SMB deployment, your buddy knows to hold position, watch for line entanglement, and keep an eye on you in case you need assistance. Once the buoy is inflated and on the surface, you can resume the safety stop together, holding the line as a visual and positional reference. Smooth SMB deployment is a skill that improves with practice, and good communication with your buddy makes every deployment safer and more reliable.
Etiquette and Conservation Signals
Respectful diving includes signaling behaviors that protect the reef and coordinate group etiquette.
Do Not Touch
Wave one hand with palm facing your buddy and shake your head, or make a stopping gesture near the reef. This reminds teammates to maintain buoyancy and keep hands off coral, sponges, and marine life. Even a gentle touch can damage fragile polyps. Reinforce this signal when you see someone drifting too close or steadying themselves on the reef.
Reef conservation starts with individual choices, and peer communication is part of the solution. If you see a buddy about to touch coral or grab a sponge for stability, a polite 'do not touch' signal can prevent damage. Most divers appreciate the reminder, especially newer divers who may not yet have the buoyancy control to hover without support. Over time, as skills improve and awareness grows, the need for these signals decreases, but they remain an important tool for protecting the reef and educating less experienced team members.
Watch Your Fins
Point to your own fins or the back of your leg and make a kicking motion, then signal Stop or point down at the reef. This alerts a diver whose fin tips are striking coral behind them—a common problem for newer divers still mastering buoyancy and spatial awareness. A polite signal prevents damage and helps your buddy improve their trim.
Fin awareness is a skill that develops over many dives. New divers often focus on what is in front of them and forget that their fins extend behind, sometimes kicking coral, stirring sediment, or striking other divers. A gentle 'watch your fins' signal, delivered without judgment, helps a buddy become more aware and adjust their body position. Over time, this feedback loop improves everyone's diving and reduces reef impact across the community.
Slow Down / Relax
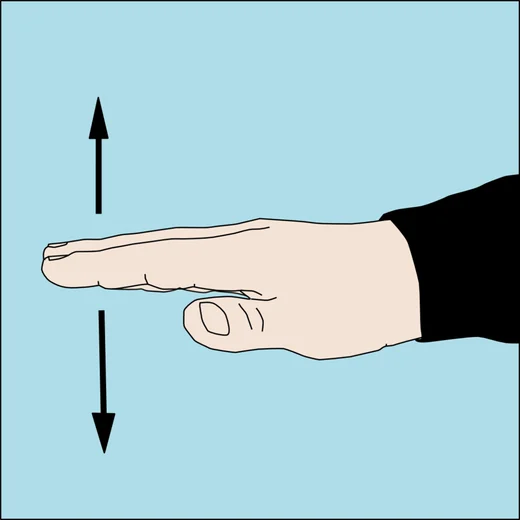
Hold both hands out, palms down, and move them slowly downward in a calming motion. This tells an anxious or rushing buddy to breathe deeply, slow their pace, and conserve air. It is a supportive signal that acknowledges stress without shaming, and it often helps a diver regain composure and enjoy the dive.
Anxiety underwater is common, especially for newer divers or in challenging conditions. If you notice a buddy breathing rapidly, moving erratically, or showing signs of stress, the 'slow down' signal combined with calm body language can be remarkably effective. Pair the signal with a reassuring OK check and deliberate, slow breathing on your part. Humans are social creatures, and your calm demeanor can help your buddy relax and reset. Once they slow down and regain control, the dive can continue safely and enjoyably.
Do's and Don'ts for Effective Hand Signals
- Do make signals large, slow, and deliberate so they are easy to read even in lower visibility or at a distance.
- Do make eye contact before signaling; a gesture sent to empty water helps no one.
- Do confirm every query signal with a clear response—do not assume your buddy saw your answer.
- Do practice signals on land, in the pool, and during shallow training dives until they become second nature.
- Do agree on any non-standard or specialty signals during the pre-dive briefing.
- Don't use a thumbs-up casually underwater; it always means ascend, never okay or good job.
- Don't rush your signals or make vague gestures; clarity prevents dangerous misunderstandings.
- Don't ignore a signal from your buddy or divemaster; acknowledge every message even if the answer is 'wait, I don't understand.'
Following these guidelines will improve your communication and make you a better, safer dive buddy. Over time, good signaling becomes instinctive, and you will find yourself reading and responding to signals without conscious thought. This fluency frees your attention for navigation, marine-life observation, and the pure enjoyment of being underwater.
Regional and Instructor Variations
While core signals are widely taught, some regions, dive cultures, and individual instructors use variations or additional gestures. European divers might signal air pressure in bar while North American divers use psi; some guides use a closed fist rotating at the wrist to mean 'circle around' while others point and trace an arc. Technical divers, cave divers, and rebreather divers add specialized signals for gas switches, light failures, and line management. Before any dive with a new buddy or guide, confirm the signals you will use—especially OK, up, and problem—so there is no ambiguity when it matters. In my years leading dives here, I always take two minutes on the boat to review signals, and I ask new divers to show me their OK and Stop so I know they understand. That small investment prevents confusion at depth.
Cultural differences also influence signaling style. Divers from some regions are taught to be very formal and precise with signals, while others adopt a more casual, expressive approach. Neither is wrong, but understanding the difference helps you adapt to your buddy's style. If your buddy uses expansive, theatrical gestures, mirror that energy. If they are terse and minimal, keep your signals compact and efficient. This flexibility in communication style is part of being a good buddy and makes diving with new people easier and more enjoyable.
Practicing and Improving Your Signal Fluency
Like any language, fluency in scuba hand signals comes from repetition and use. New divers should practice core signals on dry land until they can execute them without thinking, then rehearse them in the pool during confined-water training. During open-water certification dives, instructors will quiz you on signals as part of the evaluation. Once certified, continue practicing with your regular dive buddies, especially before trips to new environments. Many experienced divers run through the signal set on the ride to the dive site, particularly if diving with a new team or after a long break. If you have not dived in a while, consider a refresher program that reviews and reinforces hand signals along with other essential skills.
If you dive in challenging conditions—night dives, lower visibility, or deep walls—practice signaling with a light in one hand, or while wearing thick gloves. Work on making signals large enough to be seen from a distance but controlled enough not to waste energy. Film yourself if possible and watch for clarity, speed, and body position. Good signaling is smooth, confident, and unhurried, and it reflects the same calm competence that defines good buoyancy and finning technique.
Another effective practice method is to run through scenario drills with a buddy on land or in shallow water. Take turns playing the role of the diver with a problem and the responding buddy. Practice signaling ear trouble and pausing descent, signaling low air and coordinating ascent, signaling entanglement and freeing each other. These drills build muscle memory and confidence, and they prepare you to respond effectively when a real problem arises. The time you invest in practice pays dividends in safety, efficiency, and enjoyment on every dive.
Teaching Hand Signals to New or Nervous Divers
If you are diving with a less experienced buddy, a family member taking their first Open Water dives, or someone returning after years away, spend extra time on signals. Demonstrate each one slowly, ask them to mirror it back, and explain the context in which it will be used. Pair signals with the buddy check and descent routine so they form part of a natural rhythm. Encourage questions and clarify any confusion before entering the water. During the dive, check in more frequently than you might with a seasoned partner, and respond to every query signal even if you feel fine—your consistency builds their confidence and reinforces the communication loop. If your buddy seems overwhelmed, slow down, hover at a comfortable depth, and let them practice a few signals in a no-stress environment before continuing the dive. Patience on early dives creates competent, confident divers who will enjoy the sport for years.
Teaching also means modeling. Your buddy learns as much from watching you signal as from verbal instruction. Make every signal crisp and clear, respond promptly to their signals, and demonstrate calm, deliberate communication throughout the dive. If they make a mistake or forget a signal, correct it gently and without frustration. Learning underwater communication is a process, and everyone progresses at their own pace. Your supportive, patient approach can make the difference between a buddy who grows to love diving and one who feels anxious and quits after a few dives.
Pre-Dive Signal Checklist
Before every dive, especially with new buddies or a new guide, run through this quick verbal and visual review:
- Confirm OK signal and verify everyone understands the difference between OK and thumbs-up.
- Review ascend, descend, and level-off signals.
- Agree on air-status and problem signals.
- Confirm any directional or specialty signals you plan to use.
- Decide how you will signal air checks and agree on frequency (e.g., every ten minutes or at certain depth milestones).
- Establish a plan for separation: follow your guide or operator's lost-buddy protocol.
- Confirm any photography or marine-life signals the group wants to use.
- Ask if anyone has specific concerns—ear trouble, cold sensitivity, anxiety—and agree on signals to address them.
This checklist takes only a few minutes but dramatically improves dive safety and communication. Many accidents and misunderstandings trace back to assumptions made on the boat, and a thorough pre-dive signal review eliminates those gaps. Think of it as part of your standard pre-dive routine, as essential as checking your air and adjusting your weights.
When Signals Fail: Backup Communication
Even the best signalers occasionally face situations where hand signals are not enough. Heavy particulate, night dives beyond your light beam, or a buddy who is task-loaded and not looking can all interrupt communication. In these cases, gentle physical contact—a light touch on the shoulder or arm, never a grab or startle—can get attention. Once you have eye contact, proceed with the signal. For complex messages, such as a change in dive plan or a detailed problem description, use a slate or wet-notes. Many divemasters carry slates routinely; consider adding one to your kit if you dive in challenging conditions or with less experienced partners. Some divers use underwater lights to signal even during the day, flashing the beam to attract attention before signing. Learn and respect local norms and adapt your approach to your buddy's comfort level.
Slates are particularly useful for navigation discussions, air-planning changes, or explaining complex problems. A quick sketch or written note can clarify what hand signals cannot. Some divers also carry pre-printed cards with common signals, questions, or instructions, which can be helpful when diving with buddies who speak different languages. These tools supplement hand signals and add flexibility to your communication toolkit.
Technology is also expanding communication options. Full-face masks with integrated communication systems, underwater intercoms, and even text-messaging dive computers are becoming more common. While these tools are not yet mainstream in recreational diving, they may eventually supplement or replace traditional hand signals in some contexts. For now, hand signals remain the universal standard, and mastering them is essential for every diver.
The dive centers in our directory take signal communication seriously and build review time into every briefing. Signal review is a standard part of a thorough pre-dive briefing, and it is reasonable to ask any operator how they handle it.
Signal Communication During Specialty Dives
Different dive environments and activities introduce additional signal needs. Night divers use lights to communicate—sweeping a beam in a circle often means OK, flashing rapidly may signal a problem. Wreck penetration divers add signals for line management, exit routes, and silt-outs. Photographers and videographers need agreed-upon signals for 'stay clear,' 'light this subject,' and 'I am done shooting.' If you plan to pursue any of these specialties, your instructor will teach the relevant signals as part of the course. Always discuss and confirm specialty signals during the pre-dive briefing, and never assume your buddy knows a gesture you learned in a different context. Clear agreement prevents misunderstanding and keeps specialty dives safe and enjoyable.
Technical diving adds layers of complexity to signal communication. Gas-switch signals, decompression-stop coordination, and problem-escalation protocols all require precise, unambiguous gestures. Technical divers also use touch contact and line signals when visibility is zero or when separated by distance. These advanced techniques are taught in technical training and should never be improvised. If you are moving into technical diving, invest time in mastering the extended signal vocabulary and practice it until your responses are automatic.
The Role of Dive Insurance and Emergency Preparation
While hand signals help prevent problems, every diver should also prepare for emergencies that cannot be solved underwater. Comprehensive dive insurance and membership in a dive-accident network provide critical support if things go wrong. Organizations like Divers Alert Network (DAN) offer emergency hotlines, evacuation coordination, and medical coverage tailored to diving incidents. Carrying a DAN or equivalent membership card, knowing your operator's emergency procedures, and having a plan for evacuation and recompression-chamber access are all part of responsible dive planning. These preparations complement good communication and ensure you are ready for any scenario, no matter how unlikely.
Emergency preparation also includes reviewing lost-buddy protocols, out-of-air responses, and uncontrolled-ascent procedures during every pre-dive briefing. Knowing what signals and actions to take in an emergency, and having practiced them in training, can save lives. Hand signals are the first line of communication, but they are most effective when backed by solid training, good equipment, and comprehensive emergency support.
Booking and Planning Considerations
When booking dives, especially if you are new to an area or returning after time away, ask your operator about their signal-review process. Good operators build time into every briefing to confirm signals, demonstrate their team's variations, and answer questions. They also check diver experience levels and adjust the pace and complexity of briefings accordingly. If you are diving with a new buddy, arrive early so you have time to introduce yourselves, review signals together, and discuss any concerns before boarding the boat.
Planning also means preparing yourself physically and mentally. Get adequate rest the night before, stay hydrated, and review your skills if it has been a while since your last dive. Many divers find that a few minutes of mental rehearsal—visualizing the descent, practicing signals in their mind, and running through emergency procedures—improves their confidence and performance on the dive. This mental preparation complements the physical skills review and makes every dive safer and more enjoyable.
Conservation and Reef Etiquette Beyond Signals
While hand signals help coordinate respectful behavior underwater, true conservation starts with awareness and personal discipline. Maintain excellent buoyancy so you do not need to touch the reef for stability. Secure all gear to prevent trailing hoses or gauges from dragging across coral. Choose reef-safe sunscreen and avoid products that harm marine ecosystems. Support dive operators who follow sustainable practices, limit group sizes, and educate divers about reef conservation. Use your signals to encourage good behavior in others, and lead by example. Every dive is an opportunity to protect the reef and share that ethic with your buddies and the broader dive community.
Conservation also includes reporting problems when you see them. If you notice damaged coral, entangled marine life, or discarded fishing gear during a dive, signal your buddy and guide, and report it to your operator after surfacing. Many Cozumel operators participate in reef monitoring and conservation programs, and your observations contribute to ongoing efforts to protect the island's underwater environment.
Our Recommendation
For divers at every level, fluency in scuba hand signals is essential. Here is how to match your learning and practice to your experience:
- Brand-new divers and Discover Scuba participants: Focus on core signals—OK, Stop, Up/Down, and basic problem indicators—and practice them on land and in shallow water until they feel natural. Choose one of the dive centers in our directory that includes thorough signal review in every briefing.
- Open Water students and recently certified divers: Build on the core set by adding problem signals (ear trouble, something wrong, cold) and basic direction signals (which way, look here). Review signals before every dive and do not hesitate to ask your buddy or guide to repeat or clarify.
- Advanced and regular recreational divers: Expand your vocabulary to include air-status checks, marine-life indicators, and etiquette signals. Practice signaling in different conditions—night, current, varying visibility—and work on clarity and speed.
- Divemasters, instructors, and technical divers: Master the full range of recreational signals plus any specialty signals relevant to your discipline. Be ready to teach, demonstrate, and quiz students or less experienced buddies, and lead by example with clear, patient communication on every dive.
No matter where you dive or what level you hold, effective use of scuba hand signals is the foundation of safe, connected, and enjoyable underwater exploration.
Related on Cozumel Dive Hub
Dive sites:
- Barracuda Reef Cozumel: Advanced Drift Dive Site
- C-53 Shipwreck Dive Site
- Cantarel Cozumel – Seasonal Eagle Ray Diving
- Casa Blanca Cozumel: Complete Dive Site Guide
Dive shops:
Courses:
More reading:
- Best Scuba Diving in Mexico: How Cozumel Compares
- Discover Scuba Diving Cozumel: Your First Underwater Adventure in 2026
- Travel Insurance for Cozumel Scuba Diving: The Essential 2026 Guide
- Minimum Age for Scuba Diving in Cozumel: The 2026 Family Guide
- Scuba Diving in Cozumel with Kids: The Ultimate Family Adventure Guide
Trusted resources: PADI, SSI, and DAN (Divers Alert Network).
Plan Your Cozumel Dive Trip Ask Us A Question
Hand signal illustrations by Peter Southwood and Thomei08, via Wikimedia Commons, used under CC BY-SA 3.0 and CC BY-SA 4.0. They show the RSTC standard set; confirm your own team's signals in the pre-dive briefing.
Frequently Asked Questions
What does a thumbs-up mean underwater?
How do I signal that I am running low on air?
What should I do if my buddy does not respond to my signal?
Are scuba hand signals the same worldwide?
Can I use hand signals at night or in low visibility?
What does it mean when a divemaster makes a flat hand and rocks it side to side?
How often should I check in with my buddy using hand signals?
Do I need to learn different signals for technical or cave diving?
What is the best way to practice hand signals?
Can I invent my own hand signals with my regular dive buddy?
Share This Article

Carmen Novelo
Carmen Novelo is a Cozumel native and an active scuba instructor and dive guide on the island. She has spent twelve years diving the Cozumel reef system, and writes about its dive sites, conditions and marine life for Cozumel Dive Hub.